Plandroid - Graphical Air Conditioning Design and Quoting Software
Plandroid Help Documentation
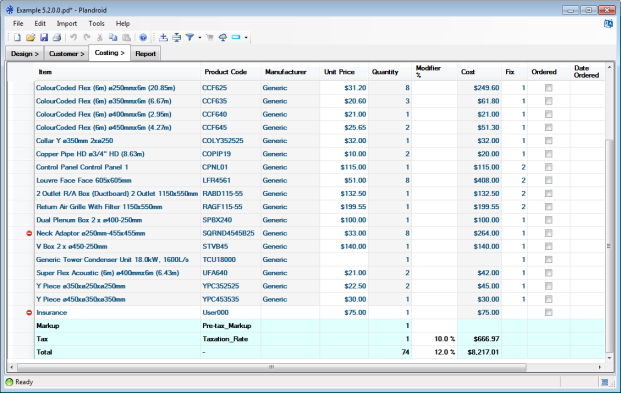
The Costing page is a spreadsheet-style take-off list of all the cost items in your design.
The parts that make up your design are listed, but you can also add your own cost items
with the Add Cost Item toolbar button ( ). Any part
that is a symbol is not included in the costing. Any parts that are hidden or filtered out in this page are also
not included in the Report page.
). Any part
that is a symbol is not included in the costing. Any parts that are hidden or filtered out in this page are also
not included in the Report page.
 |
You Can Edit Fields in the Costing Page
Fields that have a white background can be edited, but fields that have a grey background are generated by the program and cannot be edited. Totals rows are shown highlighted with a light blue background. Some data, such as the unit price of a part, its price modifier, or its installation cost is still editable even though it comes from the parts catalog. Any new value you give it will be used the next time you use that part. These modifications are stored on a per-user basis, so any changes you make will not change the costings of another user using the same computer - although they can use the menu item Import -> Price Edits File to import a file that specifies the edits to use. Also, a number of options settings can be specified in Tools -> Options -> Costing -> Catalog edits to give you fine control over how catalog edits are used. For more information see the Catalog Edits File Structure section.
 |
Cost Items
Cost items may be hidden using the Hide Items button ( ).
This tool lets you easily modify your costing table for ordering different sets of components from different suppliers, for
example. The tool is available from the toolbar or from the context menu (the context menu is opened by right-clicking anywhere
in the spreadsheet), and will hide whichever rows you have selected. Cost items which are hidden are no longer added to the
total cost shown in the Totals row, and likewise do not appear in any parts tables in the Report. Hidden items are also
excluded from automatic parts orders. Pressing the button again will
unhide all hidden cost items. You can use the context menu tool to hide additional items when some are already hidden.
).
This tool lets you easily modify your costing table for ordering different sets of components from different suppliers, for
example. The tool is available from the toolbar or from the context menu (the context menu is opened by right-clicking anywhere
in the spreadsheet), and will hide whichever rows you have selected. Cost items which are hidden are no longer added to the
total cost shown in the Totals row, and likewise do not appear in any parts tables in the Report. Hidden items are also
excluded from automatic parts orders. Pressing the button again will
unhide all hidden cost items. You can use the context menu tool to hide additional items when some are already hidden.
Clicking on the pull-down arrow on the right side of the Filter Items button ( ) lets you filter the items shown in the costing list. You can filter either by the part manufacturer
or (if you have multiple levels) by plan level or by design mode (refrig, evap, etc.). Only those items passing the filter are shown and costed -
all other items are hidden, in the Costing page as well as in the Report page. The Remove Filters drop-down item will show all hidden items just as the Unhide
All button does. Any active filters are shown in the status bar.
) lets you filter the items shown in the costing list. You can filter either by the part manufacturer
or (if you have multiple levels) by plan level or by design mode (refrig, evap, etc.). Only those items passing the filter are shown and costed -
all other items are hidden, in the Costing page as well as in the Report page. The Remove Filters drop-down item will show all hidden items just as the Unhide
All button does. Any active filters are shown in the status bar.
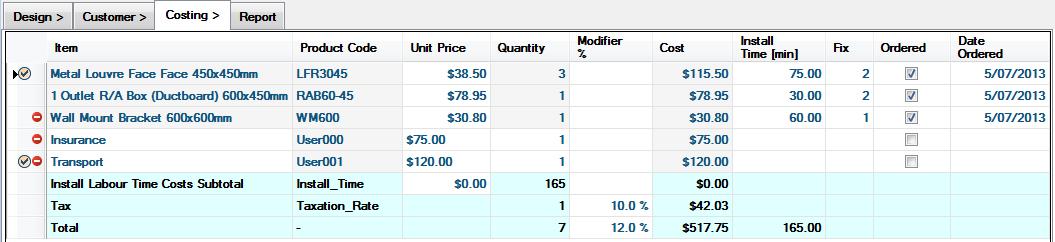
The leftmost column may contain icons next to an item. The red not-drawn symbol
( )
means that the item is not drawn in the final report diagram (to keep it from becoming
cluttered). The check mark (
)
means that the item is not drawn in the final report diagram (to keep it from becoming
cluttered). The check mark ( ) means that item has been selected as an always add
item. Always add items are added automatically to any new design you create so you cannot
forget them. They are set with the context menu item Always Add This Item. If you mark a
drawn part as always add, then it will also be inserted into the design canvas
in a new design, so long as its product code can be found in your loaded catalogs.
) means that item has been selected as an always add
item. Always add items are added automatically to any new design you create so you cannot
forget them. They are set with the context menu item Always Add This Item. If you mark a
drawn part as always add, then it will also be inserted into the design canvas
in a new design, so long as its product code can be found in your loaded catalogs.
You can also edit an item in the price modifier column. To specify a discount, use a negative modifier (e.g. -10%), or to specify a price mark-up use a positive modifier (e.g. 10%).
The Fix order can be edited for any item, and can take any value from 0 to 9. A value of zero means that the fix order is undefined. (The fix order is the sequence in which parts are installed in a building during a new build).
Offcuts
The Costing Options control what to do with offcuts from drawn parts such as flexible ducting. You can choose to always use whole lengths, or to reuse offcut pieces. Offcuts are only reused if they can be used as a whole length themselves, without having to be joined to other offcuts. Offcuts are not reused for rigid ducting.
You Control Which Columns Are Shown
Any columns may be hidden by right-clicking on a column header to bring up the context menu, and selecting Hide Column or unchecking the column title. Any hidden columns can be shown by checking its column title, or by selecting Unhide All Columns.
Currency Settings
The program uses the currency of your default location as set in your Windows settings. If you need to change the currency that is used, set your computer to be in the location that uses that currency.
Adding Other Cost Items
There are three ways you can add in additional costs that are not physical catalog items:
- Using the Add Cost Item toolbar button ()
lets you add any item to the costing take-off. You can edit the item's description or even its product code, so it can represenet anything.
Naturally a Cost Item of this type does not exist on the canvas.
- You can specify labour costs (see below) that are associated with any part that you've added from a catalog. These can be given in currency or time values.
- You can add cost items, including labour cost items, as special catalog items that you can add to the canvas from costing catalogs. These will appear in your costing take-off list as regular part list items, but ones that only have a price, and no other function. You just need to have a catalog with cost items loaded. You can edit the labels and prices of any of these items to suit your own requirements.
Labour Cost Estimates
There are options to automatically cost the labour involved in installing your system. In the Menu item Tools -> Options -> Costing you can choose to include the install costs as install time (with an estimate of the time in minutes taken to install each component), or install costs (with a fixed labour price for each component). Selecting either one of these options will add the labour costs subtotal row to the spreadsheet, and add this to the total cost. (Adding both of them will display both columns, but will not add their respective subtotals to the total cost, as it would not make sense to add them twice). The install time is given in minutes, and you will need to set your labour cost per minute to calculate the total labour cost with this option. Hovering the mouse over the install time will show a tooltip with the value converted to hours and minutes, and hovering over the cost per minute field will show you the labour rate per hour.
Tax as a Cost Item
You can also elect to show a cost item row for tax in the same options Menu item (Tools -> Options -> Costing). Checking the Show tax row checkbox will display the tax row, and you can edit the Modifier percentage which is added to the total cost.
If you are displaying the tax row, you will also get the pre-tax mark-up row added, which allows you to control if any mark-up is pre or post tax.
Minimising Your Costs
If you right-click to bring up the costing page context menu, you can select the Replace Part menu item to see which parts you could replace the current selection with from your loaded catalogs, and what the effect that would be on your total price. The cost difference is shown next to the part, inclusive of all taxes, install costs and markups.
 |
The replacent parts are listed in order of savings, with the cheapest parts listed above the more expensive options. Parts that will reduce your costs are shown in green, those that have no effect are shown in black, and those that will increase your costs are shown in red. This makes it easy to optimise your costs if you have access to multiple suppliers.
Stock Management
The columns 'In Stock', 'Dispatched', and 'Date Dispatched' can be shown for each cost item. This allows you to manage your own stock levels within your company. (You can show or hide these or any columns on from the header row context menu).
Ordering Parts
You can use the Order toolbar button ( ) on this
page to directly order your parts via email, if you have used a catalog from a supplier who supports
automatic ordering. Only parts which are not hidden are included in the order.
) on this
page to directly order your parts via email, if you have used a catalog from a supplier who supports
automatic ordering. Only parts which are not hidden are included in the order.
Once you have ordered parts, they will be marked as ordered and shown with their order date in the costing spreadsheet. You can also manually set the order status or order date by editing those fields, or you can directly mark items as ordered or not ordered by using the appropriate context menu items on a selection of cost items.
Emailing Orders
When emailing orders, Plandroid will invoke your default email program to send the order. This is only possible if both Plandroid and your email program have the same User Context (Administrator or User privileges). If you are getting errors sending an email from Plandroid and your email program is open, you should close your email program and try to send the email again. This will mean that Plandroid will open your email program with the same user context that it currently has itself, which should avoid any problems.
If you do not yet have a default email program set up, you can typically do that through the Windows Control Panel, under Programs.
Uploading to the Cloud
The Upload to the Cloud toolbar button ( )
can be used to send the parts take-off list to a stock management server over the internet. To use this function, you must first have
set the Tools -> Options -> Costing -> Cloud Connection settings to use the server of your choice. If you haven't
already completed the server Authentication (login) process, you will automatically be prompted to do so
before using the service.
)
can be used to send the parts take-off list to a stock management server over the internet. To use this function, you must first have
set the Tools -> Options -> Costing -> Cloud Connection settings to use the server of your choice. If you haven't
already completed the server Authentication (login) process, you will automatically be prompted to do so
before using the service.
The supported 3rd-party products are:
- SimPRO
- Climat
You can also synchronise your catalogs between Plandroid and the cloud server by using the context
menu item  Synch Catalogs on the Design page -> Parts catalog tab. You can synchronise by either
uploading the Plandroid catalog data or by downloading the pricing information from the cloud
into Plandroid.
Synch Catalogs on the Design page -> Parts catalog tab. You can synchronise by either
uploading the Plandroid catalog data or by downloading the pricing information from the cloud
into Plandroid.
Highlighting Rows
The layout of your costing table can be customised using the Highlight Row toolbar button
( ). Item rows can be highlighted by
choosing any combination of text font, text colour, and background colour for that row. Current highlight
styles are shown when you open the drop-down list of styles, plus you can add or modify any style by
choosing the Set Highlight Styles item. You can even define the default Normal style
to suit your preferences.
). Item rows can be highlighted by
choosing any combination of text font, text colour, and background colour for that row. Current highlight
styles are shown when you open the drop-down list of styles, plus you can add or modify any style by
choosing the Set Highlight Styles item. You can even define the default Normal style
to suit your preferences.
 |
Finding Costed Items in the Design
If you need to locate a specific item type or types in your design, you can use the context menu item Select in Design on any selection of cost items. This function will highlight those items by selecting them in the Design page. For this to be effective, the Parts tool tab must already be selected in the Design tab, otherwise subsequently changing to the Parts tab will clear the selection.
The next page is the Report page.