Plandroid - Graphical Air Conditioning Design and Quoting Software
Plandroid Help Documentation
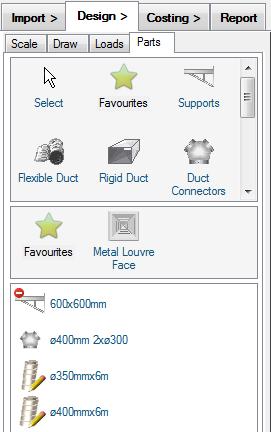
Plandroid comes with an extensive library of catalogs. You can choose any number of catalogs from this library to load into the program, which then determines which parts are available for you to use in your design.
You select which catalogs are loaded with the menu item Tools -> Select Catalogs. This catalog data is displayed in the Parts catalog tab, and is protected with a digital signature so that it cannot ordinarily be changed by a user. However, you still have a lot of control over how you use your catalogs, and how your catalogs are displayed in the Parts tab. For example, you can:
- Hide (or unhide) parts that you don't use and don't want to see in your catalog
- Add (or remove) parts to a Favourites category so you can quickly find them
- Edit the price or the label of any part
- Specify the colour used for a part
- Specify the default draw style to use for a part
- Set the defaults for when a part's label should be shown (Always, As per options, or Only when selected)
- Set a part to be Drawn or Not Drawn to the report or on printing
- View any window as Tiled or in a List format
- Sort any window into alphabetical ordering, or leave in the default catalog ordering
- Define your own automatically added part groups
- Choose if you want to have units specified by their label or their part numbers
You access most of these options by right-clicking on any icon in the Parts tab, and selecting the appropriate item from the context menu. Some of these actions are covered in more detail below.
Hiding Catalog Entries
Any part type, part sub-type, or part can be selected in the catalog view and marked as hidden using the context menu item Hide Item. A hidden part can still be used, for example it may be automatically added when a different part is added, but it is just not visible in the Parts tab. You can unhide all hidden parts, or just specific hidden parts, using the context menu tool Unhide Item. If a part has also been added to Favourites, hiding it in one view will also hide it in any other.
Using Favourites
You can place parts or even whole sub-types in the Favourites catalog item (marked with a yellow star) by using the context menu item Add to Favourites. This allows you to put the parts you use most often in a place where you can find them quickly. You can even create your own sub-types within the Favourites so you can organise your favourite groups however you wish.
 |
Items that are in your Favourites list can be removed with the context menu item Remove From Favourites. Once you add an entire sup-type, you can remove any or all of the parts that it contains. When you add a part to your favourites with the context menu, you can choose which favourites group you add it to. You can rename your own favourites group by double-clicking on its label in the catalog, and you can select which icons to use for each favourites group with the sub-type context menu item Favourites -> Change Icon. If you are in Favourites, you can also drag-and-drop sub-types or parts between the various favourites groups to organise them as you wish.
Notes
- When using the Automatic Design toolbar tool, parts in your Favourites will be used before any other suitable parts in your loaded catalogs.
- De-selecting a catalog will not permanently remove any favourite parts that belong to that catalog. Reloading the catalog will restore them to your favourites.
- You can export (save) and import (load) different configurations of Favourites using the corresponding context menu items on the Favourites part type.
- Hiding an item in the Favourites will also hide it in its original location, and vice-versa.
Editing Catalog Entries
You can edit the price or the label of any part in the catalog using the context menu items Edit Catalog Price or Edit Catalog Label on a part in the (bottom) part selection window. Although you can also edit the individual label on any part in the design canvas, editing the label of a part in the catalog itself will affect all new copies of that part added.
If you have selected a user-drawn part such as ducting or piping, you can also use the Catalog Edit Colour context menu item to specify the colour you want that part to be drawn in.
You can toggle any part between printed and not printed by toggling the Hidden when Printing context menu item. (There is also a Hidden when Printed context menu item for those parts that you have placed on the canvas).
Using Custom Auto-Added Parts
You can customise your own automatically added part groups so that you always get the right parts added
together. This is done with the Canvas context menu item Auto Add This Part to.
To use this tool, it is best to start with a new report and then add all the parts that you would
like to add as a group to the blank canvas. Position them relative to each other,
and also on top or underneath each other, as you want them to be added. In the design canvas select those
parts which you want to be added as slave parts by clicking on them (you can select multiple parts
using [Ctrl] + click). These are the parts which will be automatically added.
Now right click on your selection and use the context menu item Auto Add This Part to, and choose
any one of the unselected parts shown in the list as the master part. This is the part
which will own the slave parts, and which you will add when you want to get the entire group added. It will
now appear in the catalog with the small blue has added parts symbol ( ) in the catalog. When you next add this part, it will automatically add
the slave parts you have just specified.
) in the catalog. When you next add this part, it will automatically add
the slave parts you have just specified.
Remember that you can always override this and drop a part without adding any other parts by holding down the [Alt] key while dropping it.
To remove a custom auto-added part, choose Remove Auto-Add Parts from the Parts catalog list view context menu. This only applies for custom auto-added parts, however. Added parts that are defined in the catalog itself cannot be removed in this way, instead you can uncheck the context menu item Use Catalog Auto-Add Parts.
Label Parts with Product Codes
Parts can be labelled with their product code / part number instead of the normal labels if you so choose. Under the menu item Tools -> Options -> Design -> Labels -> Label with product codes you can choose to label all parts with their product codes, or only units. There is also a context menu option for labelling units with their product codes in the Design -> Parts window if you select a Unit in the Part Type or Subtype window.
Creating Custom Price or Discount Schemes
You can create your own fully customised price or discount schemes in Plandroid. You can also save your modifications and share them with your colleagues, for example. See How do I edit part prices? for further details.
Creating Your Own Catalogs
You can also create and edit your own complete catalog files with the tool Tools -> Catalog Editor. This is an advanced function and requires adequate familiarity with the program to use properly. See the Catalog Editor documentation for further details.
Go back to How do I?