Plandroid - Graphical Air Conditioning Design and Quoting Software
Plandroid Help Documentation
Importing an Image
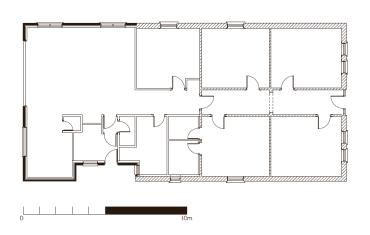
Plandroid is most powerful when you are creating a design on top of a building floor plan image. This image needs to be in one of the image formats that the program can read, such as a GIF, PNG, JPEG/JPG, or PDF. If your customer has emailed you an image in one of these formats, you can import it right away with the Open plan image button in the Plan toolbox on the Design page. If you only have a fax or other hard copy of the house plan, you will need to scan the image in to your computer before you can open it with Plandroid.
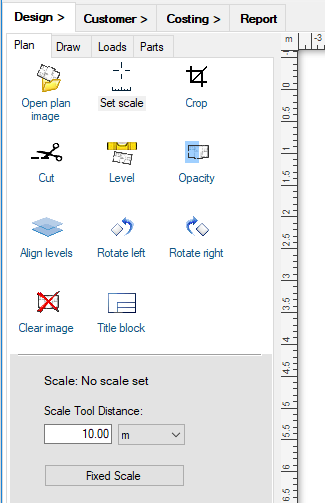 |
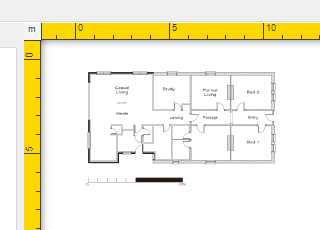
Any time you are working with an unscaled plan image, the canvas rulers will be drawn in yellow as a reminder that you still need to scale it.
 |
Scaling Your Floor Plan Image
Once you have imported
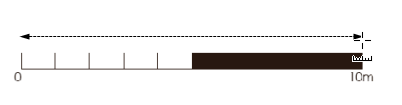
an image, you should immediately use the Plan -> Set scale tool ( ) to scale your floor plan image.
Enter any known dimension in the Set Tool Distance field, and drag the Set scale tool over the
part of the plan image that represents that distance.
) to scale your floor plan image.
Enter any known dimension in the Set Tool Distance field, and drag the Set scale tool over the
part of the plan image that represents that distance.
 |
Alternatively, if you already know the scale of the image you are using, you can use the Fixed Scale button to set the image scale directly.
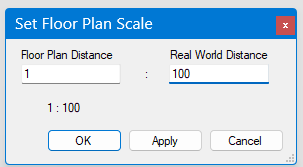 |
Either way, the program will then know the physical scale of the floor plan image for all subsequent calculations. The canvas borders will be drawn in normal grey when your plan has been successfully scaled.
Remember that you can always draw a house plan from scratch with the Draw tools in the Design page, if you need to.
Floor Plan Images are Different to Custom Images
Images in Plandroid can represent different things, and be used in different ways in Plandroid. A floor plan image (opened with the Design -> Plan -> Open Floor Plan Image tool is a special type of image, in that you can't select it or manipulate it, but you can scale it and edit it with the Design -> Plan editing tools.
Other images that represent anything that isn't a floor plan are fundamentally different. Such an image could be your company logo, a profile image of a unit you're using, or anything else. You can open this type of image with the Design -> Draw -> Add Image tool, or just drag and drop it onto the canvas. A free image, or custom image of this sort can be freely manipulated - resized, moved, and rotated, unlike a floor plan image.
Although a custom image is not the floor plan image, you send a custom image to a floor plan image with the context menu item Merge With Plan Image. This can only be done for floor plans that are in a raster (pixellated) format, so if you need to merge an image with a vector PDF image, you'll need to rasterize the PDF image first. Also note that while a PDF can be used for a floor plan image, it cannot be used as a custom image.
Note on Image Formats
Note that, in general, you are likely to have better quality images if your house plan images are in PNG, GIF, or PDF format. This is because these formats are not lossy, that is, the image data is compressed without discarding any of the image information. Images with sharp edges, such as a house plan, are best saved in these formats. Other popular formats, such as JPEG, can (depending on the image) have greater levels of compression - resulting in a smaller file size - but they do so by discarding information from the image. This can result in sharp edges becoming blurred and reducing the quality of your resulting design image. There is always a trade-off between image quality and file size.
Plandroid fully supports PDF image files. Note, however, that a PDF may contain image data in a raster format (where the image is stored in bits for each picture element (pixel), such as a bitmap), or in vector format (where the image is stored as lines), or a mixture of both. A raster image will become blurred if you zoom into it, while a vector image will remain crisp. The highest quality print images will be produced if you can obtain your house plan in vector format. Scanners will generally embed a raster image into the PDF files they produce.
Note that to create a PDF image of your design you need to print your design to PDF with a PDF printer.
Rasterizing a PDF Plan Image
There are times when it is helpful to convert a PDF plan image to a raster (fixed resolution) image. The pan and zoom response is often better for a raster image, less memory can be required in some cases, and only raster plan images can be flipped with the toolbar flip tools. The Tools menu item Tools -> Rasterize PDF Plan can be used to convert a PDF plan to a raster plan image.
The Rasterize PDF Plan tool lets you choose the resolution of the resulting plan image, so you can balance the memory use (or file size) against the resolution that suits your requirements.
Greyscale Your Plan Image
You can draw any floor plan image in greyscale with the toolbar tool Greyscale Floor Plan. Drawing a coloured floor plan in greyscale often helps to contrast your design more clearly. You can toggle this setting on or off.
Viewing a Plan Image
Sometimes you may need to look at your floor plan image in some detail even when there are zones and parts in the way. Simply hold down the view plan hotkey P to view only the plan image.
Cleaning or Cropping an Image
You can cut, crop, rotate, and adjust the opacity (transparency) of the plan image you are using with the Plan tools. It is common to remove image artefacts, cluttering text or dimensions in this manner to make a professional presentation. The Cut tool cuts a quick rectangle in its normal mode, but if you hold down the [Alt] key you can cut an arbitrary polygon shape. Any region cut from a plan image can be pasted as a custom image back into the design with the toolbar Paste button (or [Ctrl] + V), as the image is automatically placed on the clipboard. The background colour to use for the editing operations can be picked directly from the plan image by holding the [Ctrl] key with any of these editing tools.
 |
There is an example house plan image provided with the program installation (see the Quick Overview section for more details).
Making a Screen Grab
If you wish to import a design from some other package, such as a CAD program which does not allow you to save to PDF, then you can always do a screen grab. This is a slightly more complex process whereby you capture the image on your screen and save the image in one of the above formats that can be read by Plandroid. This is usually done with the built-in Windows Snipping Tool, which you can activate with the key combination [Shift] + [Windows] + S. The Snipping Tool then lets you save the image to a file. Other tools let you do this too, such as the free software Screen Grab Pro, or you can just press Print Scrn (to capture the whole screen). You will then need to paste it into an image program such as Windows Paint or the excellent (and free) IrfanView. Save the image to your computer (select the .PNG file format), and then open the file in Plandroid with the Open Plan Image tool.
Using Your iPad / iPhone
A great way to create a floor plan is to use the MagicPlan iPad or iPhone app, available from the iTunes app store. This app uses augmented reality to measure and draw your floor plan by taking pictures of your house, which you can export in PDF, among other formats.
Go back to How do I?