Plandroid - Graphical Air Conditioning Design and Quoting Software
Plandroid Help Documentation
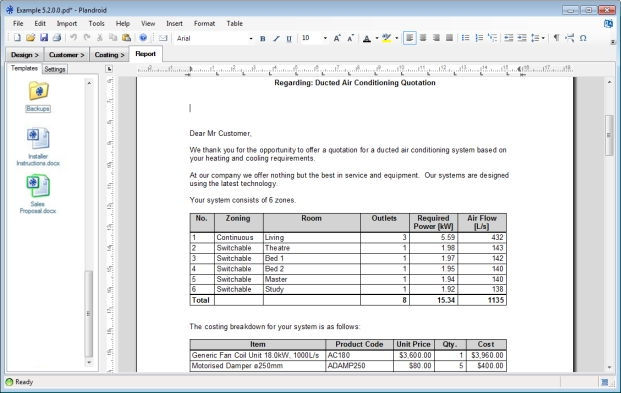 |
The Report page is where you create report documents to print or to send, such as sales proposals for your customers, or installation instructions for your installer. The editor is a powerful document editor that supports all of the features you expect in a modern word processing package, including headers and footers, images, shapes and tables. You can select which document template to use by double clicking on it in the Templates list on the left of the screen. The program will automatically fill in the fields specified in the template with the data from your design, ready to print. Only the parts shown in the Costing page are used to make a report.
Customising a Report
Even though the basic report text comes from a template, you can edit the text to customise it for your current job. For basic editing, a number of toolbar tools are provided to help you set the font style and layout to use, for example.
The context menu item Insert Detail allows you to insert data from the design into the current document. If you want a particular piece of information inserted into the template every time, then just edit the template file to include it, as described in the report templates section.
Insert Items
You can insert the following items into your document:
- Currency - the currency the catalog is using
- Customer > Contact Address - the customer's contact address
- Customer > Due - the specified due date for any action
- Customer > Email - the customer's email address
- Customer > First Name - the customer's first name
- Customer > Job Site Address - the address of the job site
- Customer > Last Name - the customer's last name
- Customer > Name - the customer's first and last name
- Customer > Phone - the customer's phone number
- Customer > Quote No. - the quote number for the job
- Customer > Status - the status of this order
- Customer > Title - such as Mr, Mrs, etc.
- Date - today's date in a selection of formats
- Design Diagrams - one image for each level of the design
- Note - any Note that has been used in the design
- Number of Levels - the number of design levels that have been specified
- Number of Outlets - the number of outlets in the design
- Number of Zones - the number of load zones defined
- Tables > Parts Costs Table - a table of the parts used and their prices
- Tables > Parts Fix Table - a table of parts in fix order, without prices
- Tables > Parts Table - a table of parts with the item description, product code, and quantity
- Tables > Zones Table - a table listing the load zones defined (see below)
- Tables > Zones Table (Hydronics) - a table listing the hydronics zones and their properties, including coil lengths
- Tables > Zones Table (Lighting) - a table listing the lighting zones and their properties
- Total Cost - the total cost of the design
- Unit > Air Supply - the total air flow supplied by all the units used
- Unit > Capacity - the total cooling capacity of all the units used
- Unit > Cooling Running Cost - the annual cost to run a unit over a standard number of hours for cooling
- Unit > Cost - the total cost of all the units used
- Unit > Description - a short description of the units used
- Unit > Heating Running Cost - the annual cost to run a unit over a standard number of hours for heating
- Unit > Indoor Model No. - a list of the product codes of all the indoor units used
- Unit > Manufacturer - a list of the manufacturers of the units used
- Unit > Number of Units - the number of units present in the design
- Unit > Outdoor Model No. - a list of the product codes of all the outdoor units used
- Unit > Return Starter Size - a list of the return starter sizes of all the units used
- Unit > Supply Starter Size - a list of the supply starter sizes of all the units used
- Unit > Cooling Power - the maximum cooling power of the unit
- Unit > Heating Power - the maximum heating power of the unit
- Unit > Phase - the electrical phase that the unit requires
Customising Tables
Any table you have inserted into your report document can be customised to show just the information you wish to show. If you select in a table, then you can use the menu item Table to insert or delete rows or columns, or otherwise modify the table. If you right-click inside an inserted table to bring up the context menu, you can select the item Set Column to set the type of data to show in that column. Likewise, you can also edit the table layout in your document template file.
Note that if you edit an inserted table and then regenerate the table (for example by leaving the tab, and then returning to it) most types of modifications will be retained, but some types can be lost. For example, modifications to the rows or row data will be lost, as the row entries will be re-generated from the design.
Parts Tables
When you insert a parts table of any kind into your report, any parts that are hidden or filtered out in the Costing page are also excluded from the parts table, so that you have complete control over what information is included in your report.
Likewise the Total Cost is only the total cost of those items that are displayed.
Zones Table
The Zones Table will show you each load zone you have defined with the number of outlets in each zone, the total required power for each zone, plus the calculated air flow rate required to match the number of air changes per hour that you have specified in the Design Options. (The zone ceiling height is used to define the zone volume for this calculation.)
There are custom zones tables for inserting the special information for hydronics and lighting designs.
The zones in the zones table are sorted in name alphabetical order by default. You can customise your own ordering by specifying the order to use in the Zones Table in the Design page. The Report will reuse the same zones ordering as specified in the Zones Table.
Headers and Footers
You can use the menu item Insert -> Header / Footer to enable headers and footers in your document. To edit one or the other, just double click in the header or footer field. To go back to editing the document body, just double click back in the document.
The Templates Selection List
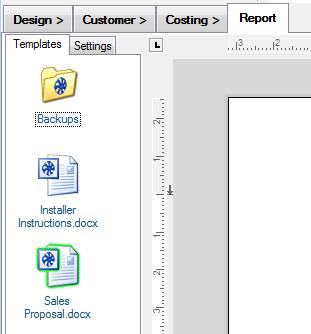 |
The templates you can select from are shown in the templates selection list. The active template used to create the current report is highlighted in the list with a green glow. Double clicking on a different template will activate it for use in the report. Note that changing the active report will lose any custom edits you may have made to the original template.
Page Settings
Any template document in Word format (with the file extension .doc or .docx) will have its own page setup information - including paper size, orientation, and margins. When you load a new template, the program will adjust its own page settings to reflect those in the template document, if it has them. These will override any settings you already have. You can view or adjust your page settings with the menu item File -> Page Setup.
You Can Save Your Report Text to Use as a Template
You can create new templates by editing the report text and inserting the fields you wish to include, and then choosing the context menu item Save As Template. This will copy the current document to your templates directory, with empty data fields. To use this new template, simply double click it in the Templates list as you would normally, and the fields you have inserted will be instantiated with the data from your current design.
You can use the context menu in the template list (opened by right-clicking in the list) to manage your templates, such as importing an external document file to use as a new template, deleting old templates or renaming them. Template files must be in Word (*.doc, *.docx), or rich text (*.rtf) format for the program to use.
You can also create your own template files in a word processor such as Word or WordPad, if you so wish, and save them in *.doc, *.docx or *.rtf format. A file can be imported into the templates directory using the template files context menu as mentioned, or you can simply drag and drop a new template file directly into the templates list.
Settings
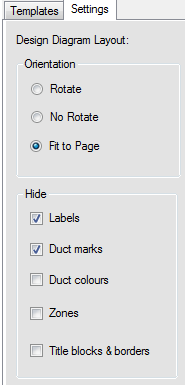 |
Next to the Templates tab is the Settings tab. This gives you quick access to the settings for showing your report (which are also available in the menu item Tools -> Options -> Report dialog box). Here you can specify if you want your report diagram rotated or not, and what to show on it (duct size labels, duct colours, zones, and titleblocks). See Options for further details.
Report Undo / Redo
Note that each page in the application has its own undo/redo buffer. However if the report regenerates its content at any point, the report undo/redo buffer is cleared and previous edits cannot be undone. This will happen if you leave and re-enter the Report page, change any Settings, or use the context menu item Insert Detail. This is a limitation for the Report page only.
The next section covers how to set up your own report templates.