Plandroid - Graphical Air Conditioning Design and Quoting Software
Plandroid Help Documentation
Selections are Filtered by the Design Tab You're In
It is straightforward to edit a design that you have in the Design Page by selecting the object you want to change and then modifying it. Just remember that the tool tab you are in (Scale, Plan, Loads, or Parts) filters what you can select with the Select tool. For example, you need to be in the Plan tool tab to be able to select a wall, the Loads tool tab to select a load zone, or the Parts tool tab to select a part.
Editing Selections
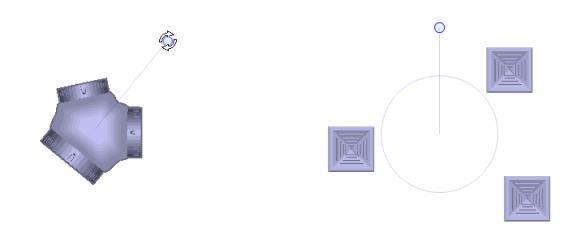
The Select tool ( ) is available from
any toolbox tab, and allows you to make selections in the design canvas. Any selected object is shown highlighted. For example,
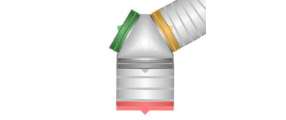
selected parts are shown highlighted (normally in blue, but pink if the part is not drawn, or purple if the part is a symbol which
is not costed). A selected part will typically have a rotation handle displayed which can be dragged to rotate the part, as shown:
) is available from
any toolbox tab, and allows you to make selections in the design canvas. Any selected object is shown highlighted. For example,
selected parts are shown highlighted (normally in blue, but pink if the part is not drawn, or purple if the part is a symbol which
is not costed). A selected part will typically have a rotation handle displayed which can be dragged to rotate the part, as shown:
 |
If you have selected 3 or more parts, you can toggle between rotation or layout resizing of the selection with the R key:
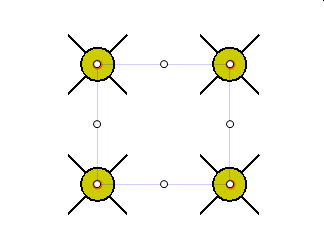 |
Here each white dot is a resize handle that you can use to change the spacing of the group. This is especially useful for spacing out lights to cover a zone, for example.
Selected objects can be moved anywhere on the canvas by dragging them with the mouse. To delete any selected objects, just hit the Delete key. To cancel any selections hit the Escape (Esc) key, or just select the canvas background.
Parts Can Have Handles
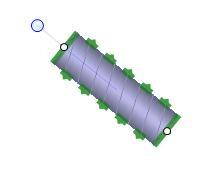
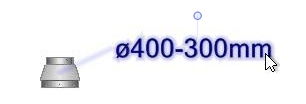
Where a part such as a rigid duct can have its length changed, this can be done by using the resize handles shown at each end of the icon:
 |
User-drawn parts, such as flexible ducting, piping, and wiring, can also be selected and moved by dragging. However, they have handles which allow you to change their shape (instead of rotation handles) after you have drawn them. Hovering the mouse over a handle allows you to select it and drag it to change the part's shape, as shown:
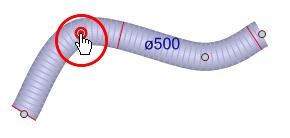 |
To add a new handle to a user-drawn part, simply double click where you want the handle. To remove an unwanted handle, double click on the handle, or hover over it and press Delete.
These steps are all described in detail in the Design page section.
Editing Labels
 |
You can edit or reposition a part's label, if labels are shown, by clicking and dragging it. Hovering the mouse over a label will show which part the label refers to with a leader line. You can edit the text of any label either by double clicking on the label, or by selecting Edit Label from the part's context menu. The context menu item Show Labels gives you individual control over exactly which labels are shown, overriding your other label display options. (A part always shows its label when it is selected).
You can incorporate dynamic data into a part's label, for example to show the air flow through a part.
Aligning Labels
For flexible ducts, if you double click on the rotation handle of the duct's label, the label will automatically be centred on the duct and aligned with the curve of the duct.
Editing Connections
 |
If you are repositioning a part that has other parts connected to it with snap-to, then those parts will automatically stay fixed to the part that you are moving. If you want to break those connections, either drag the part or parts while holding down the Control [Ctrl] key, or use the context menu item Break Connections. There are more guidelines for using snap-to – including adding compatible parts – in the How Do I Use Snap-to to Make a Design? section.
Resizing and Replacing
Remember that you can also use the Resize Part tool to resize an existing part, for example to change the diameter of your duct, or the Replace Parts tool to swap some or all parts of a certain subtype (sort) with matching parts of a different subtype, for example changing from plain to insulated flex duct of the same diameter. See the Tools section for more details.
There is also an example design you can experiment with, provided in the ...\Examples directory (see the Quick Overview section for more details).
Go back to How do I?