How Do I Integrate Plandroid with External Software?
You can integrate Plandroid with other software packages, either through the internet ("the cloud") or by launching the program with appropriate command-line parameters. Plandroid can communicate with Simpro, ServiceM8, or with any service provider who supports data delivery via email or webhooks. You can also use the program directly with any number of locally installed 3rd party programs using the command-line.
Connecting via the Cloud
The take-off list from your Plandroid design can be directly uploaded to a third-party URL such as a website. Plandroid supports the following URL targets:
You will need to have an account on the third-party website to use their services, and they will need to provide you with the URL and security credentials required to connect to their software. Naturally, you will also need an internet connection.
Before you can connect to the cloud, you'll first need to set up your connection in the Options under Tools -> Options -> Costing -> Cloud Connection. Here you need to select your service provider by name and also, if required, enter the URL (an internet or email address) obtained from your service provider.
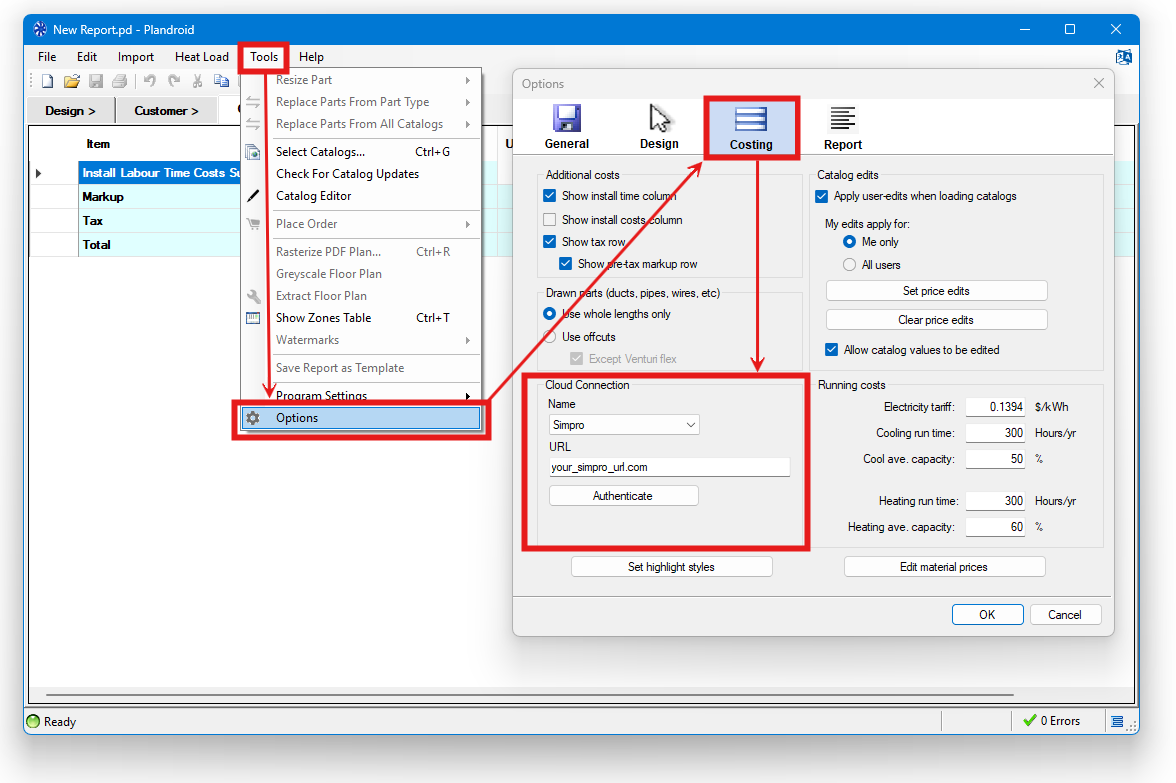
Including http:// or https:// in the URL is optional, but the program will always use https://. Some connection types require you to authenticate (log in to your account) with your security credentials. If you need to authenticate, the Authenticate button will become active, or the program will prompt you to authenticate when you go to upload.
Once you have entered this information, the cloud connection tools will become active on the Costing page. You can then use the Upload to the Cloud toolbar button ( ) to send your design data directly to your connected account. If the connection type supports it, the Design page -> Parts catalog context menu item
  Sync Catalogs will also become active so that you can keep catalog data synchronised between Plandroid and the remote software.
Connecting Using Email
Your design information can be sent to a third-party email address, which can then process the data and send it on to the relevant service provider. This is useful for sending your design data to a service provider that does not have a direct integration with Plandroid, or if you want to use a third-party service to handle the ordering process. A number of service providers have established their own integrations with a wide range of programs, including ServiceM8, simPRO, ServiceTitan, Quickbooks, MYOB, and Xero.
You can select the cloud connection name Email in the Tools -> Options -> Costing -> Cloud Connection settings to connect via email. Your service provider will supply you with a target email address to use as your URL, which will be the receiving point of your order data. Your service provider will handle the ordering process from there, usually for a fee. You need to have a local email client like Outlook or Thunderbird that Plandroid can call to use this method. It doesn't work with web-based email clients like Gmail.
Connecting to Simpro
To use the native Simpro connection, you need to select the Cloud Connection named Simpro from the connection selector. You can upload your take-off list as either a Simpro quote or job, and each part can be allocated to any Simpro cost centre. You can also upload your current catalog selection into Simpro or conversely download your Simpro costing scheme as a reprice file to use in Plandroid, so you can keep your part pricing schemes synchronised.
Authenticating for Simpro
You need to authenticate (log in to your account) on your Simpro account periodically to keep the connection secure - normally every seven days. You can do that immediately with the Options -> Authenticate button, or the program will prompt you when required.
Synchronising Catalogs for Simpro
Normally the first thing you will want to do is to synchronise your catalog data between Plandroid and Simpro. In the Design page -> Parts tab you need to open the context menu, where you can choose the Sync Catalogs item. If your catalog data is current on Simpro, you can download your Simpro price data to a catalog edits file, so that the Plandroid prices match your Simpro Base Price prices. (The program can create a new catalog edits file for Simpro that you can switch to, while keeping your existing catalog edits file, or allow you to merge the edits into your existing edits file).
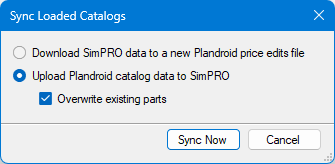
Conversely, if you want to upload your Plandroid catalog selection to your Simpro account, you can also do that. Every part in your currently loaded catalog selection will be uploaded to your Simpro account with this action. If any parts in Simpro have the same product codes as parts in your current catalog selection, you have the option to overwrite those existing parts with the Plandroid catalog data.
Uploading Simpro Data
You need to be in the Costing page to upload your take-off lists into Simpro. Use the Upload to the Cloud toolbar button () to send your data to Simpro. You can upload either a quote or a job, as either a service or a project. If you upload your list as a project, you can section it by plan level, design mode (refrigerative, evaporative etc.), manufacturer, part fix order, or none to leave it unsectioned.
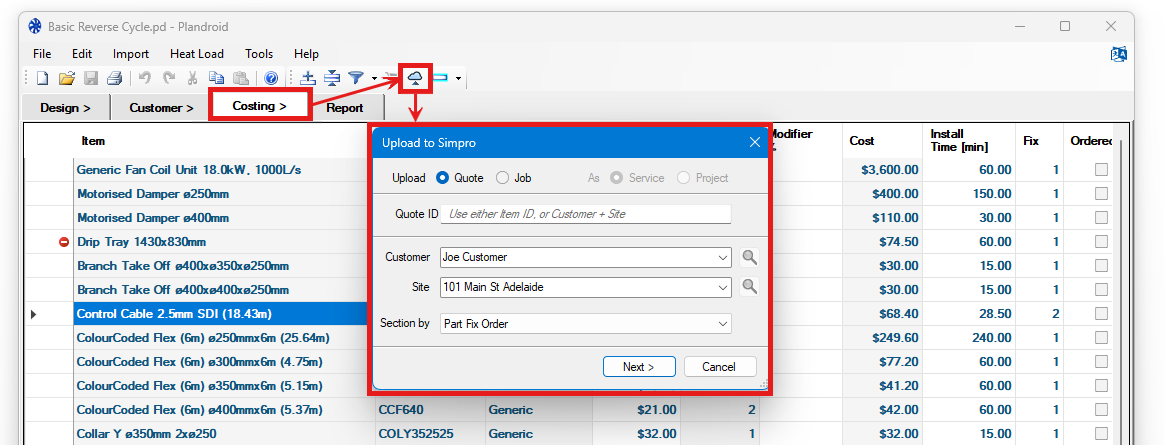
The program will copy any quote ID and/or customer and site details from the Customer page into the appropriate fields in this dialog. If you specify an existing quote or job ID directly, the program will upload your data as an edit to that record on your server. If instead of entering an ID, you supply the customer and site details, the program will use those to locate an existing record, or to create a new one if required. (If you have not entered any customer details, you will need to select an existing customer or site from the records on your server). If the program can locate an existing job or quote on your server, your data will be uploaded as an edit to that record, otherwise they will specify a new job or quote to upload your data to.
Note that you can search your customers or sites either for a string or directly by ID. To search by ID, you must prefix the ID number with a hash (#).
You can upload either parts or prebuilds to Simpro, just use the appropriate product codes for each.
Simpro Cost Centres
The next stage is to specify the Simpro sections and cost centres to use. If you are uploading to a new job or quote, you just need to specify the cost centres you want, and the program will group your items by their cost centre into a new section for each group. If you are uploading to an existing job or quote, you also need to specify which section maps to your pre-defined sections on your server, and you can only select the cost centres that have already been defined for each pre-defined section.
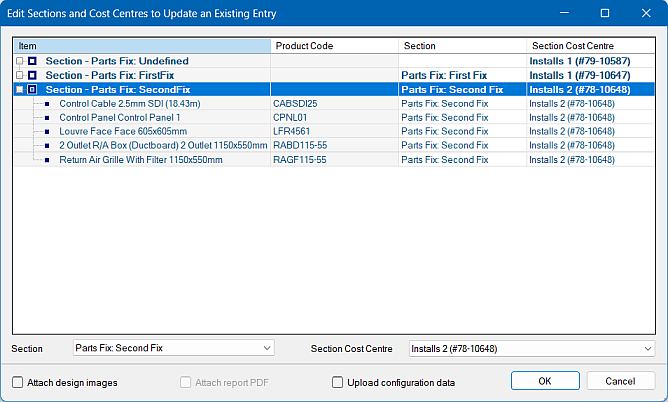
The parts will be shown grouped into the sections you specified earlier. To specify the sections and cost centres to use per section simply select that section and use the drop-down selector on the bottom of the dialog to apply your choice. To specify the cost centre to use per item, open the section (by clicking on the "+" icon) and select one or more individual items. Again, if you are editing an existing job or quote, you can only specify those cost centres that have been pre-defined for the section you have specified.
If you are showing the install times in the Costing page, Plandroid will also upload the install times. If you are not showing the install times, then no times will be uploaded. If you are instead showing the install costs, they will not be uploaded.
A part quantity can only be uploaded to Simpro if that part has a corresponding entry in the Simpro catalog data - any parts that don't exist on the server will not be uploaded (so you may need to synchronise your catalogs first). Once successfully uploaded, the program will provide you with a link to the resulting entry on your Simpro server.
Checking the Attach design images checkbox will also upload an image file for each plan level as an attachment with your data. Checking the Attach report PDF checkbox will upload a PDF of your report as well, but this can only be done after you have already viewed your document in the Report page, as this action configures data that is required to be able to generate the PDF.
Parts will be uploaded to Simpro in product code alphabetical order. Units, and parts that have connection descriptions when ordered (e.g. some Advantage Air, ACD Trade, or Polyaire parts) will have their connection descriptions included in the Simpro order Notes field if the Upload configuration data checkbox is checked.
Connecting to ServiceM8
You can use the native ServiceM8 connection to upload your take-off list or synchronise your current catalog data between Plandroid and ServiceM8. Simply select the Cloud Connection named ServiceM8.
Authenticating for ServiceM8
You need to authenticate (log in to your account) on your ServiceM8 account periodically to keep the connection secure - normally every thirty days or so. You can do that immediately with the Options -> Authenticate button, or the program will prompt you when required.
Synchronising Catalogs for ServiceM8
Normally the first thing you will want to do is to synchronise your catalog data between Plandroid and ServiceM8. In the Design page -> Parts tab you need to open the context menu, where you can choose the Sync Catalogs item. If your catalog data is current on ServiceM8, you can download your ServiceM8 price data to a catalog edits file, so that the Plandroid prices match your ServiceM8 Base Price prices. (The program can create a new catalog edits file for ServiceM8 that you can switch to, while keeping your existing catalog edits file, or allow you to merge the edits into your existing edits file).
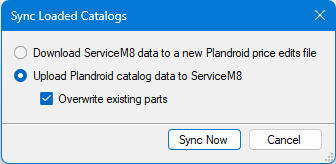
Conversely, if you want to upload your Plandroid catalog selection to your ServiceM8 account, you can also do that. Every part in your currently loaded catalog selection will be uploaded to your ServiceM8 account with this action. If any parts in ServiceM8 have the same product codes as parts in your current catalog selection, you have the option to overwrite those existing parts with the Plandroid catalog data.
Uploading ServiceM8 Data
You can upload your take-off lists directly into ServiceM8. In the Costing page you can use the Upload to the Cloud toolbar button () to bring up the Upload to ServiceM8 Options.
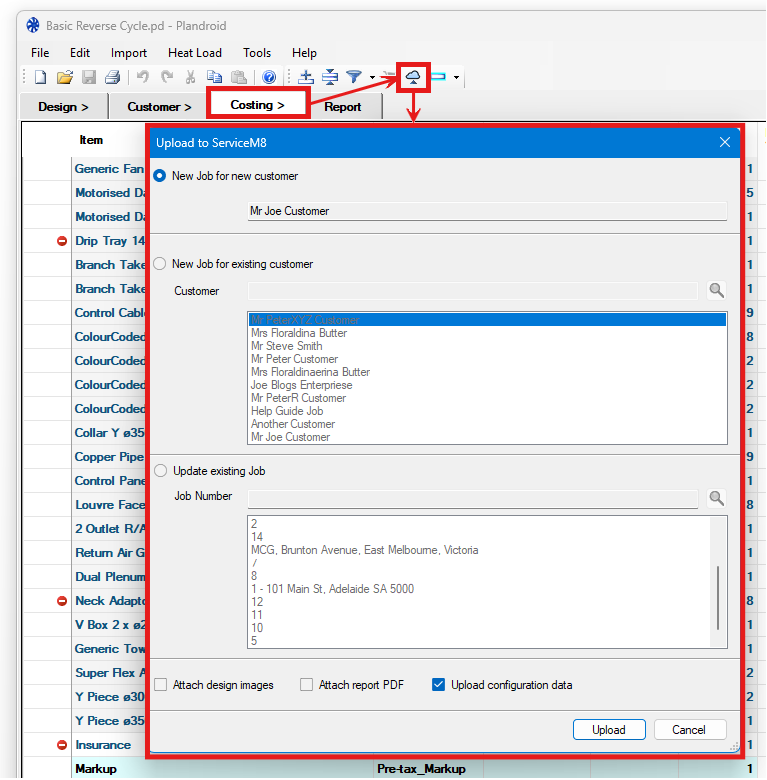
Here you have the option to upload a new job for a new customer, a new job for an exising customer, or you can update an existing job. The two latter options will let you search for existing customers or jobs to use as a target.
You also have the option to attach your design images, your report PDF, or configuration data if required.
Connecting Using Webhooks
You can select the Webhook connection method in the Tools -> Options -> Costing -> Cloud Connection settings to send data to a website. With a webhook, your provider gives you a target URL on their server that you can send your data to. The webhook listener can process your data without having to go through the authentication process. This also provides a flexible way to connect with a wide range of third-party sites.
The data that we send using this method includes comprehensive information on your design, including your zones and their heating and cooling loads, for example. The system of units that this engineering data is in depends upon the units you have selected in your Options settings.
To use this service, you will need to get a dedicated URL from a third-party supplier that will connect you to their service for a fee.
Calling Plandroid via the Command Line
Plandroid can be used with job management software such as Tektools or your custom inventory or management software, so that it functions as a seamless part of your sales process. Plandroid can be called from the command line (or from such a software package) with command-line arguments controlling how the program should work. The command-line arguments can specify a base design to use, one or more floor plan image files that will overwrite any floor plan images already in the base design, and a settings file containing various parameters to control the program. For example:
> plandroid.exe base_design.pd plan.gif settings.xml
This allows, for example, a set of base designs to be used with new floor plan images, so that you can modify an existing design to suit a new house layout. Plandroid can be configured so that it writes out the resulting design image, the parts list, and saves the Plandroid save file (.pd) file before returning to the calling software.
The command-line arguments can be specified in any order, but subsequent files will overwrite any data in earlier files. For example, if you want the settings customer data to overwrite any existing customer data in the base_design.pd file, the settings file must be given after the base design file name.
The floor plan image files can be in any one of the formats: PNG, GIF, JPG, BMP, or PDF.
If a PDF file has multiple pages, you can specify the page number (starting from 1) immediately after the PDF filename, for example:
> plandroid.exe base_design.pd plan.pdf 1 settings.xml
If you have multiple plan levels, you can specify multiple floor plan image files where each image will be used for the subsequent level's floor plan. For example, if your base design has 3 or more levels you could specify:
> plandroid.exe base_design.pd plan1.gif plan2.pdf 1 plan2.pdf 2 settings.xml
In this example, different pages of the same PDF file (plan2.pdf) are used for the design levels 2 and 3. You cannot skip a level. To overwrite the floor plan image of a higher level, you must also overwrite the floor plan images of each lower level.
Additionally, you can specify two Plandroid files, such as:
> plandroid.exe base_design.pd import_design.pd settings.xml
In this case, the parts (and nothing else) from the second .pd file will be imported over the top of the base .pd file. Any pre-existing parts in the base file will be retained. If the designs have multiple levels, then the program will overlay each level in sequence.
The following is an example Plandroid XML settings file:
<?xml version="1.0"?>
<settings>
  <customer>
    <quoteNo>012345</quoteNo>
    <firstName>FirstName</firstName>
    <lastName>Surname</lastName>
    <title>Mr</title>
    <address>Addr</address>
    <city>City</city>
    <state>State</state>
    <postcode>Postcode</postcode>
    <siteAddress>Site Addr</siteAddress>
    <siteCity>Site City</siteCity>
    <siteState>Site State</siteState>
    <sitePostcode>Site Postcode</sitePostcode>
    <phone>(09) 1234 5678</phone>
    <email>name@email.com</email>
    <status>Quote</status>
    <due>2012-08-09 10:55 AM</due>
  </customer>
  <options>
    <parentApp>CallingAppName</parentApp>
    <PdfPrinter>Microsoft Print to PDF</PdfPrinter>
    <filename>PlandroidSaveFileName</filename>
  </options>
  <output>
      <csv functions="true" manufacturers="true" />
  </output>
</settings>
All fields are optional in this file, however the parentApp element must be specified to activate the associated Return To parent app toolbar button, which allows you to export the relevant data and return to the calling software.
If you exit the program by using the Return To parent app toolbar button, the program will use the supplied filename value to write a Plandroid save file, a CSV export of the parts take-off list, a summary of the zones in your design as a .XML file, and an image of the design. If the PdfPrinter element is not specified, the design images will be in .png format, one image for each level. If a PDF printer name is supplied, the program will try to print the design images to that printer, with each level a separate page in a single PDF file. The filename value may contain a directory path. If it does not, or the specified path does not exist, then the path of the settings file will be used for writing the output files.
The output element offers options for fine control over the output information. The csv element has optional attributes for requesting extra output information in the CSV file, namely the part function definitions, and the part manufacturers' names. The column order may vary depending on various settings. This information is normally used only in specialist applications.
Reading Zone Data Using QR Codes
Load Zones data can be inserted into the design canvas as a QR Code using the Insert QR Code button ( ) on the Load Zones table dialog. This data can be read by any QR code reader, for example by a phone app used to program a zone controller.
The QR code stores a condensed version of the load zone data that captures the most important information about the zone. The exact data varies depending on the design mode you've chosen. The data string has the following format:
[String format version number]|[Design mode identifier]|[Numerical data units]|[Zone 1 data]|[Zone 2 data]...
The design mode identifier is a two-character string, for example Re for a refrigerated design, RC for a reverse cycle design, Hy for a hydronics design, etc.
Each zone has its own data block, where the zone data has the format:
[ID]:[Zone name]:[Description character]:[Numerical data]
The description character is S or C for switchable or continous flow for air flow designs, C or R for coil or radiator zones for hydronics, and S, E or ? for supply, extract, or unknown flow for ventilation designs. A lighting design always uses the character R for required lumens. The numerical data is usually the required air flow, but can also be hydronic flow rates for hydronic systems or the required luminosity for lighting designs. So for example, a typical QR string for a refrigerated design could be:
1.0|Re|L/s|1:Living:S:360|2:Study:S:115|3:Master:S:116|4:Bed 2:S:117|5:Bed 1:S:118|6:Theatre:S:119
Contact us at support@plandroid.com for technical assistance in integrating Plandroid into your own process software.