How Do I Use a Design as a Template?
You Can Set Up Template Files
You use a template file when you start a new design. Whenever you create a new design, whether from starting the Plandroid program, using the menu item File -> New or using the New Report toolbar button, the program will let you select a template file to use as your starting point. This can be an empty file, or it can be a file that has whatever title blocks, notes, design mode, or initial design components you wish to start your design with. You can also use templates to configure the detailed design checks that you want to apply in your work.
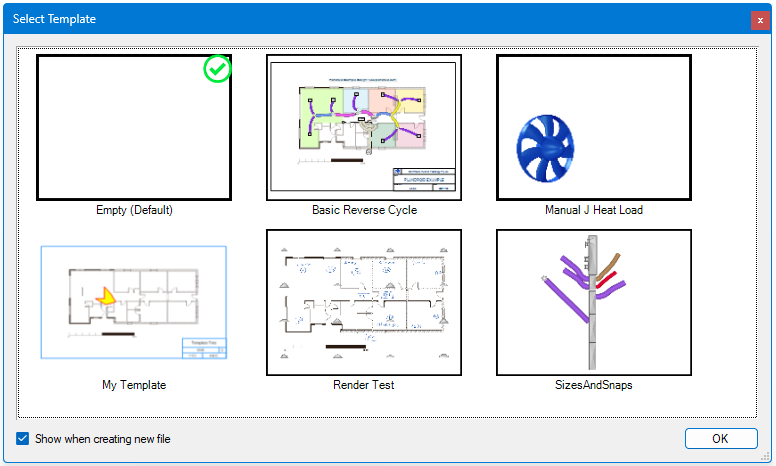
One file in your templates is used as your default template file, and will be marked with a green check mark ( ). You can change your default file with the context menu item Set as Default. If you uncheck the Show at start-up or Show when creating new file checkbox then the default file will automatically be selected whenever you start a new file, without showing the selection dialog.
The context menu on the Select Template items also lets you edit the thumbnail image, rename the template, or delete a template.
To create a new template go to the menu item File -> Save As Template and the file you are currently working on can be saved as a template file. You will be given the option to create a thumbnail from the screen automatically.
The menu item Tools -> Options -> General -> Prompt for Template options settings also lets you control when you are asked to select a template file, and gives you another place where you can select a default template.
You Can Import Designs
You may wish to reuse designs you have already made previously by importing them into your canvas. Importing a design is different to using a templates file in that only the parts are imported from the design, and these are not offered as a starting file when creating a new design. Normally you would use a template file whenever you start a new design, and then later you may choose to import a design from your library of past solutions if you are doing a similar job to a previous one. This can be a good way to increase your work efficiency.
To use a file in this way, simply load your house plan, scale it, and draw your load zones as normal. Then using the menu item Import -> Design you can select a previous Plandroid (*.pd) save file and import the parts from that design. Only the catalog parts are added with this tool - any other plans, zones or walls etc. in the overlaid design are discarded. Then simply reposition the components to suit the new plan layout by dragging them into place. If you have connected the parts in your design using snap-to, everything will remain connected as you do the repositioning, and it will only take minutes to complete an entire custom design from start to finish. In this way you can use your collection of previous designs as a library of solution "templates".
Remember that you can also reposition your entire design relative to a floor plan in one action if you first use
Edit -> Select All and then do a normal drag. Select All will select all objects from all
tabs in your design, although to drag the entire design, you will need to click and drag an item that can normally be
selected in your current tab. To rotate your entire design, you can use the group rotation handle, or
the toolbar button Rotate Selection ( ).
).
See How do I use an edited plan image? for further details.