How Do I Use Snap-to When Making a Design?
- Home
- Help Documentation
- How Do I?
- How Do I Use Snap-to When Making a Design?
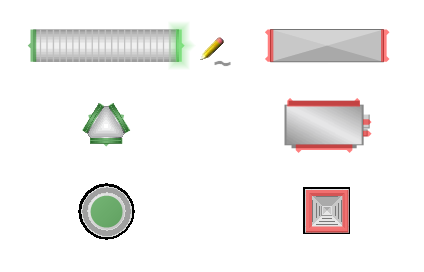
Connector snap-to lets you join parts together that have matching connectors. To match, the connector must have the same size and shape as the connector on the part you wish to join it to. Connectors can be either circular or rectangular. If a connector can match the part or tool you are using, it is shown in green, or if not, in red. A connector will glow green to show that it has locked onto a matching connector or tool, and will snap-to if you complete your action at that point.

A connector may come in multiple sizes. If a specific size matches the tool or part you are using, the connector will be shown in the matching size.
Some types of rigid ducting also support snap-to at any point along the side of the ducting.
Dynamic Part Resizing
If you are using a draw tool, adding a new part to the canvas, or moving a part on the canvas, the tool or part can automatically snap to a part of a different size, so long as there is an equivalent part of a different size in the loaded catalogs. The connector will be shown in red (to show it is incompatible) until the part is close enough to snap, at which point it will resize itself into an equivalent part that can make the connection. This saves having to switch draw tools to an exact duct size, or having to be overly fussy about choosing the correctly sized part from the catalog.
This functionality can be controlled with the Dynamic Part Resizing settings in the Options.
Breaking Connections
If you are repositioning a part that has other parts connected to it with snap-to, then those parts will automatically stay fixed to the part you are moving. If you want to break those connections, either drag the part or parts while holding down the Control [Ctrl] key, or use the context menu item Break Connections.
When you draw walls or loads, they can also "connect" if they share common points. These can also be separated if you hold down the Control key while you drag an item.
Finding Compatible Parts
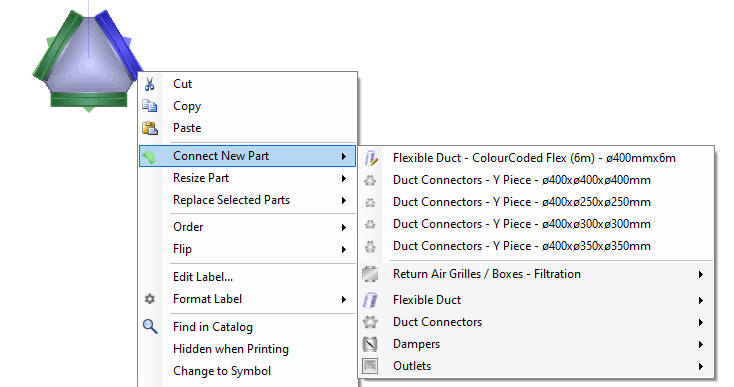
You can use the canvas context menu item Connect New Part to see and select only those parts in your active catalogs that can make a connection with the part you have selected. Choosing a part will add it directly to the selected part in the canvas. This saves the effort of searching through your catalogs to find a correctly sized matching part. If the selected part has multiple connectors, the closest connector to where you have clicked on the part is used. This is shown by drawing the selected connector in blue.

The first items listed with this tool will be suggestions based on parts you have commonly used in the past, parts that have already used in your design, and parts that are in your Favourites. Then all possible compatible parts will be listed under the separator bar. If you are adding a drawn part, you will get the draw tool for that part, so you can draw it exactly where you need it.
Neck Adaptors
Diffusers and grilles are often supplied by the manufacturer as a kit including the appropriate neck adaptor. Such a part can connect directly to round flexible ducting, and will be shown with a round connector (for example, the round diffuser shown bottom left in the above image). Other diffusers and grilles require a neck adaptor to be fitted before they can connect to flexible ducting, and these will be shown with a rectangular connector which fits a rectangular neck adaptor (as in the square diffuser shown bottom right in the above image). You need to connect the appropriate adaptor before you can connect such a diffuser to your duct work.
Connectors Can Have Threads
In some cases, components may only connect to specific other components, not just any components of the same size and shape. We can define threads on a connection for this situation. Only connectors with matching size, shape, and threads (if defined) can connect.